


Greatsword in Monster Hunter Wilds Title Update 4 sits in a strange but powerful spot. On paper, it has some of the highest damage potential in the game. In practice, it often asks for perfect positioning, perfect timing, and zero hesitation. That kind of play is fun — until the hunt gets chaotic, the monster won’t stop moving, or one missed charge costs you half a minute.
This build exists for that reality. Instead of chasing peak numbers or ideal conditions, this is a realistic comfort Greatsword build. It’s built for real hunts, real mistakes, and real progression paths. You still hit extremely hard, but the build doesn’t fall apart the moment something goes wrong. If you like Greatsword but don’t want every hunt to feel like a high-stakes execution test, this setup is designed for you.
About the Build
Comfort on Greatsword doesn’t mean playing slow or safe. It means reducing friction.
It means:
-
Faster, more forgiving charge timing
-
Enough survivability to recover from mistakes
-
Damage that stays high even when play isn’t perfect
Greatsword already rewards patience and decision-making. This build leans into that identity instead of fighting it. You wait for windows, you commit when it makes sense, and when something goes wrong, you can recover instead of carting instantly.
This setup is built around three main ideas.
First, reliable charged hits.
Focus, sheath speed, and skill synergy make it easier to land meaningful hits without feeling rushed or punished for waiting an extra second.
Second, stacked passive power.
Instead of one big conditional damage source, the build layers multiple bonuses that stay active through most of the hunt. You’re not relying on one gimmick to carry your damage.
Third, forgiveness without neutering damage.
Defensive tools like Guts and Divine Blessing are here to keep you alive — not to turn the build into a tank. You still play aggressively, but with a safety net.
Weapon Choice
The build uses a Gogma Greatsword (Ostrak Oblivion), and this is one of the few non-negotiables. Artian weapons must be rolled, and nothing about this build assumes perfect luck.
You want Lord’s Soul on the weapon. That’s the baseline. The build is structured around having it, and without it, you lose a meaningful chunk of consistency and value.
If you can also roll Gogmapocalypse, the build scales even better. This unlocks additional elemental synergy and makes Mutual Hostility part of the damage package. That said, this is a bonus — not a requirement.
Greatsword gives you flexibility here, and this build takes advantage of that.
-
Focus is mandatory. Faster charge times directly translate to more usable windows.
-
Offensive Guard rewards good guard timing without forcing risky play.
-
Crit Draw, Crit Boost, or Critical Eye can be slotted depending on whether you favor draw attacks or sustained charge play.
This flexibility is intentional. The build adapts to how you play Greatsword, not the other way around.
This build is especially effective in high-pressure fights like Gogmazios, where long commitment windows and chip damage punish overly greedy setups. If you want a detailed breakdown of that encounter — including positioning, safe windows, and phase management — see our full Gogmazios guide.
Armor Setup
This setup uses a mix of Bale, Udra, Gogmazios, and Duna armor pieces. The exact pieces matter less than the synergy they create.
The armor combination is chosen to:
-
Activate multiple powerful set bonuses
-
Provide strong offensive scaling
-
Leave room for comfort and utility skills
You’re not chasing one broken bonus, instead you’re stacking several good ones that work together. A large part of this build’s strength comes from its set bonuses.
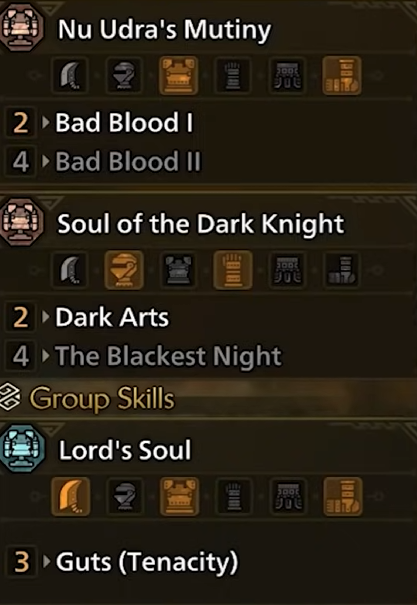
Bad Blood, which received a noticeable buff in Title Update 4, provides strong offensive scaling during active combat. It rewards staying engaged instead of disengaging constantly.
Dark Arts adds additional raw and elemental scaling, making every clean hit matter more.
Guts (Tenacity) is the quiet hero of the build. It doesn’t increase damage, but it gives you the chance to survive mistakes that would otherwise end the hunt, resulting in a cart. For Greatsword, where commitment is unavoidable, this matters more than raw defense numbers.
If you also have Gogmapocalypse, Mutual Hostility enters the picture. Think of it as an elemental counterpart to Agitator — it rewards aggressive play during dangerous phases and pairs especially well with endgame 9 star hunts.
One important note for late progression.
In Title Update 4, Armor Transcendence on high-rarity armor (Rarity 7 to 8) only increases defense. It does not affect damage, stamina, or skill behavior.
Because of that, Transcendence should be treated as a final polish, not a requirement. Once the build is complete and you have spare resources, investing into it adds extra survivability and fits the comfort theme — but the build works perfectly fine without it.
| Getting all this gear takes time. Code LUBLOG10 for 10% off if you'd rather skip grind, and get endgame ready right away. |
Charm Choice
This build is intentionally not charm-gated.
If you have a charm with a combination of:
-
Attack Boost
-
Critical Eye
-
Agitator
-
Or multiple usable slots
You’re good.
A high-quality charm like Golden Age with offensive skills is excellent if you can roll it, but the build does not require perfection. Treat the charm as a way to fill gaps, not as the core of the setup.
If your charm adds comfort instead of damage, that’s also acceptable — this build is about consistency, not squeezing every last percent.
Decoration Priorities
On paper, the skill list looks long. In practice, it feels simple.
You hit very hard thanks to high raw scaling and layered bonuses.
Focus makes charge timing forgiving and smooth.
Quick Sheathe improves repositioning and flow between attacks.
Agitator and Mutual Hostility reward you when the monster is most dangerous.
Divine Blessing and Guts keep you alive long enough to capitalize on those moments.
The result is a Greatsword that feels heavy and powerful — but not fragile. Decorations should support that philosophy.
High-priority options include:
-
Challenger jewels for Agitator uptime
-
Sheath jewels for smoother Greatsword flow
-
Focus where needed to reach comfortable charge speeds
After that, fill remaining slots with whatever improves consistency for you. Earplugs, survivability, or small quality-of-life skills all have a place here. This is not a build where you force damage jewels at the cost of usability.
Below is an example decoration layout to show how this build typically comes together. This is not a strict template — think of it as a realistic reference based on common rolls and available slots.
| Slot Size | Decoration | Purpose |
|---|---|---|
| Lv3 | Challenger Jewel | Increases Agitator uptime for consistent damage |
| Lv3 | Sheath Jewel | Faster sheathing for smoother GS flow |
| Lv3 | Sheath Jewel | Improves repositioning between charged attacks |
| Lv3 | Chain Jewel | Adds scaling damage during sustained combat |
| Lv2 | Focus Jewel | Reduces charge time for more forgiving windows |
| Lv2 | Counter Jewel | Extra value on well-timed guards |
| Lv2 | Focus Jewel | Helps reach comfortable charge speed |
| Lv1 | Protection Jewel | Small survivability boost |
| Lv1 | Protection Jewel | Makes chip damage less punishing |
| Lv1 | Flex slot | Utility or comfort of choice |
Depending on your charm and weapon rolls, you may have extra space. Use it to reinforce what you personally struggle with — charge timing, survivability, or positioning. This build is designed to adapt instead of forcing a single “correct” setup.
Closing Thoughts
Even a realistic build takes time. Rolling a usable Gogma Greatsword, farming armor pieces, and assembling everything can be RNG-heavy. Some players enjoy that process. Others just want to play Greatsword at full power without weeks of farming.
If you fall into the second category, boosting services like LevelUpper's Monster Hunter Wilds exist to handle the grind so you can focus on actual hunts instead of preparation.
Greatsword has always been about commitment. You choose a moment, you commit to it, and the weapon rewards you when that decision is right. What changed in TU4 is how unforgiving that commitment can feel when fights stop being clean.
By stacking reliable damage sources, smoothing out charge timing, and adding just enough survivability to recover from mistakes, the build lets you focus on reading the monster instead of fighting your own setup. You still need patience. You still need timing. But you’re no longer punished for every imperfect moment.
If you enjoy Greatsword because of its weight, impact, and deliberate playstyle — and you want a setup that respects that without demanding perfection — this realistic comfort build is exactly meant for that kind of hunter.
FAQ
Gogma Greatswords offer strong raw and elemental scaling and work especially well with set bonuses. Even with minimal required rolls, they provide excellent performance for Greatsword builds.
Endgame Greatsword builds perform best when they balance damage with survivability. Builds that can recover from mistakes and maintain pressure over long hunts often outperform fragile glass-cannon setups in real conditions.
For casual play, Greatsword builds that emphasize consistency over burst damage work best. High raw scaling, layered set bonuses, and survivability tools make hunts smoother and less punishing.
An easy Greatsword build prioritizes Focus, sheath speed, and defensive safety nets like Guts. This allows players to land strong hits without needing perfect positioning or timing every single attack.
Greatsword can feel difficult because it requires commitment to charged attacks and punishes mistakes.
Comfort-focused builds reduce that difficulty by improving charge speed, survivability, and recovery, making the weapon more forgiving without changing how it plays.